> ## Documentation Index
> Fetch the complete documentation index at: https://docs.codenullapp.com/llms.txt
> Use this file to discover all available pages before exploring further.
# Buttons (Actions)
> Allows submitting a Form(/dev/configurations/components/forms.md). Only works in the Form Context.
### Submit
Allows submitting a [Form](/dev/configurations/components/forms.md). *Only works in the Form Context*.
### Navigation
Allows to navigate to a different feature
Configurations
* Open/Close in a modal: Configure to open or not the feature in a modal
* Feature: Allows to select the feature I want to navigate
* Dynamic Feature: This Allows to add a custom code to open features dynamically. The custom function added here must return a valid Feature Id
* Params: List of params to be passed to the feature.
### Custom Function
Allows to execute a custom code
### Graphql
Allows executing a Graphql endpoint. Here you should use the Datasource generator
### Import
Allows to add an Import Excel action
Configurations:
* [Hook](/dev/configurations/hooks/import-excel-files.md): Hook to be executed once the excel file is loaded
* Success message: Message to be displayed after the file is imported succesfully
### Export
Allows to export excel files
Configurations
* Use Data Grid Filter: This is useful when you want to export data based on the Data Grid Items. *This only works when the action is a Global Action in a Data Grid*
* Data source: You must configure a data source to determine the data you want to export. This is how an export data source looks like:
```graphql theme={null}
query exportMovimients($where: JSON) {
MovimientosExport(where: $where) {
items {
Fecha
Valor
FormaDePago
Concepto {
Descripcion
Tipo
}
Total
TotalAntesDeImpuestos
Persona {
NombreCompleto
}
}
total
}
}
```
* All export data sources are prefixed by the `Export` keyword
* If you want to use the Data Grid filter you must define the \$where variable in the data source like the example above
The export process is async, you will receive a notification once the process ended. In the notifications drawer, you will find the link to download the file 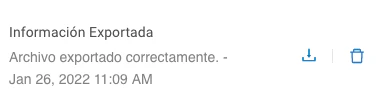 #### Personalize your exported file and/or data
If you want to personalize the data you export or how the excel file is built you can implement a hook for the export endpoint with the following configurations
* Type: Choose `Export`
* Table: Choose the table you want to customize, for instance `Movimientos` like the above example
* Code: hook implementation
```javascript theme={null}
//you will receive the next object
// options = {
// session: {
// userInfo,
// },
// queryOptions: { // parameters sent in the datasource
// where,
// order,
// hookId,
// sort
// },
// dataItems, //array with all data to be exported
// workbook, //exceljs workbook instance
// worksheet, // first sheet of book
// createDefaultWorbook, //true by default
// }
//... your code here
/*
if you want to personalize the workbook or the worksheet
you must pass createDefaultWorbook as false
more info to know how to do personalize it: https://github.com/exceljs/exceljs
*/
//you must return an object with the same structure
// options = {
// dataItems, //array with all data to be exported
// workbook, //exceljs workbook instance
// worksheet, // first sheet of book
// createDefaultWorbook, //switch this to false if you want to customize the excel file and dont want codenull create the file,
//if you leave this as true, then coodenull will create the excel file for you based on dataItems property
// }
//return options object
options;
```
### Personalize Exported Data and Excel File with one example:
To customize the data exported and the structure of the Excel file generated, you can implement a hook for the export endpoint with the following configurations:
* Type: Choose Export
* Table: Select the table you want to customize, e.g., Movimientos.
* Code: Implement the hook as shown below.
Example Hook Implementation
```javascript theme={null}
const exportData = async (options) => {
// Ensure there is data to export
if (options.dataItems.length === 0) {
throw new Error('No data available for export');
}
// Access the worksheet named 'NameOfSheet'
const worksheet = options.workbook.getWorksheet('NameOfSheet');
// Define the new column headers for the worksheet
worksheet.columns = [
{ header: 'Name', key: 'Name' },
{ header: 'Phone', key: 'Phone' },
{ header: 'City Name', key: 'CityName' }
];
// Map data items to rows and populate the worksheet
const rows = options.dataItems.map((item) => {
const { Name, Phone, City } = item;
return {
'Name': Name,
'Phone': Phone,
'CityName': City?.Name
};
});
// Add rows to the worksheet
worksheet.addRows(rows);
// Customize options for export
options = {
worksheet,
createDefaultWorbook: false // Set to false to customize the Excel file
};
return options;
};
// Execute the exportData function with provided options
exportData(options);
```
#### Use a specific hook for your export action
If you have multiple hooks for the same Entity, you can specify which hook you want to use to export your data
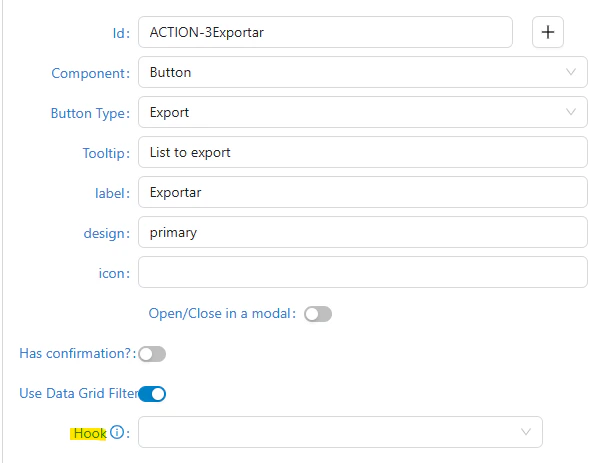
For doing that you would need to specify the hook id in the export data source configuration and the button configurations
1. Set a hook for a specific export action\\
#### Personalize your exported file and/or data
If you want to personalize the data you export or how the excel file is built you can implement a hook for the export endpoint with the following configurations
* Type: Choose `Export`
* Table: Choose the table you want to customize, for instance `Movimientos` like the above example
* Code: hook implementation
```javascript theme={null}
//you will receive the next object
// options = {
// session: {
// userInfo,
// },
// queryOptions: { // parameters sent in the datasource
// where,
// order,
// hookId,
// sort
// },
// dataItems, //array with all data to be exported
// workbook, //exceljs workbook instance
// worksheet, // first sheet of book
// createDefaultWorbook, //true by default
// }
//... your code here
/*
if you want to personalize the workbook or the worksheet
you must pass createDefaultWorbook as false
more info to know how to do personalize it: https://github.com/exceljs/exceljs
*/
//you must return an object with the same structure
// options = {
// dataItems, //array with all data to be exported
// workbook, //exceljs workbook instance
// worksheet, // first sheet of book
// createDefaultWorbook, //switch this to false if you want to customize the excel file and dont want codenull create the file,
//if you leave this as true, then coodenull will create the excel file for you based on dataItems property
// }
//return options object
options;
```
### Personalize Exported Data and Excel File with one example:
To customize the data exported and the structure of the Excel file generated, you can implement a hook for the export endpoint with the following configurations:
* Type: Choose Export
* Table: Select the table you want to customize, e.g., Movimientos.
* Code: Implement the hook as shown below.
Example Hook Implementation
```javascript theme={null}
const exportData = async (options) => {
// Ensure there is data to export
if (options.dataItems.length === 0) {
throw new Error('No data available for export');
}
// Access the worksheet named 'NameOfSheet'
const worksheet = options.workbook.getWorksheet('NameOfSheet');
// Define the new column headers for the worksheet
worksheet.columns = [
{ header: 'Name', key: 'Name' },
{ header: 'Phone', key: 'Phone' },
{ header: 'City Name', key: 'CityName' }
];
// Map data items to rows and populate the worksheet
const rows = options.dataItems.map((item) => {
const { Name, Phone, City } = item;
return {
'Name': Name,
'Phone': Phone,
'CityName': City?.Name
};
});
// Add rows to the worksheet
worksheet.addRows(rows);
// Customize options for export
options = {
worksheet,
createDefaultWorbook: false // Set to false to customize the Excel file
};
return options;
};
// Execute the exportData function with provided options
exportData(options);
```
#### Use a specific hook for your export action
If you have multiple hooks for the same Entity, you can specify which hook you want to use to export your data
For doing that you would need to specify the hook id in the export data source configuration and the button configurations
1. Set a hook for a specific export action\\
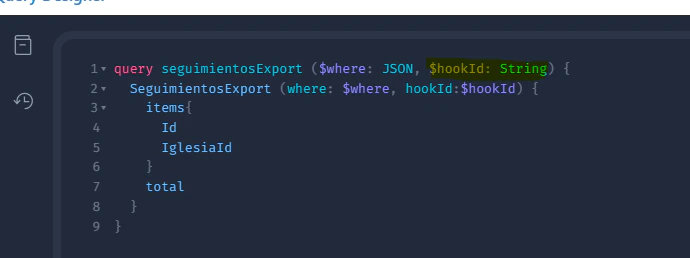
 2. Then we have to set the variable HookId to graphql (`$hookId: String`) query e.g:\
\\
2. Then we have to set the variable HookId to graphql (`$hookId: String`) query e.g:\
\\